Sharp R-308A Manual do Utilizador
Consulte online ou descarregue Manual do Utilizador para Micro-ondas Sharp R-308A. Sharp R-308A User manual Manual do Utilizador
- Página / 115
- Índice
- RESOLUÇÃO DE PROBLEMAS
- MARCADORES
- EP-308A/EP-308AS 1
- Revision 2
- Copyright 3
- Table of Contents 4
- List of Figures 7
- List of Tables 9
- BIOS Menus 10
- 1 Introduction 11
- 1.1 Overview 12
- 1.2 Features 12
- 1.3 Front Panel 13
- 1.4 Connectors 13
- 1.5 Technical Specifications 14
- 1.6 Dimensions 16
- 2 Installation 17
- 2.1 Unpack the Panel PC 18
- 2.2 Packing List 19
- 2.3 Drive Installation 20
- 2.4 Mounting the System 22
- 2.5 Bottom Panel Connectors 22
- Page 14 24
- 2.5.3 USB Device Cable 24
- 2.5.4 VGA Monitor Connection 25
- 2.6 Power Connection 26
- 2.7 Driver Installation 26
- Page 18 28
- 2.8.1 Troubleshooting 29
- Page 20 30
- 2.9 Thermal Printer Setup 31
- Page 22 32
- Page 24 34
- Page 26 36
- Page 28 38
- Page 32 42
- Page 34 44
- Page 36 46
- Page 38 48
- WARNING: 49
- 3 BIOS Setup 50
- 3.1 Introduction 51
- 3.3 Advanced 54
- 3.3.1 CPU Configuration 55
- Configuration 56
- DEFAULT 62
- Page 56 66
- 3.4 PCI/PnP 77
- 3.5 Boot 80
- 3.5.2 Boot Device Priority 83
- 3.6 Security 86
- 3.7 Chipset 87
- Page 80 90
- 3.8 Exit 91
- Page 82 92
- 4 System Maintenance 93
- 4.2 Motherboard Replacement 94
- 4.3 Cover Removal 94
- Page 86 96
- A Safety Precautions 97
- A.1 Safety Precautions 98
- EP-308A/EP-308AS POS 100
- Page 90 100
- A.2.2 Cleaning Tools 100
- B BIOS Options 101
- C Terminology 105
- Page 96 106
- Page 98 108
- D Watchdog Timer 109
- Page 100 110
- NOTE: 110
- E Hazardous Materials 112
- Disclosure 112
- Mercury 113
- Page 104 114
- Page 105 115
Resumo do Conteúdo
EP-308A/EP-308AS POS Page iIEI Technology Corp. User Manual MODEL: EP-308A/EP-308AS Mini POS PC with 1.6GHz Intel® Atom CPU,VGA Output, Gigabit Eth
EP-308A/EP-308AS POSPage x BIOS Menus BIOS Menu 1: Main ...
EP-308A/EP-308AS POSPage 90 Except for the LCD panel, never spray or squirt liquids directly onto any other components. To clean the LCD panel, g
EP-308A/EP-308AS POS Page 91Appendix B B BIOS Options
EP-308A/EP-308AS POSPage 92 Below is a list of BIOS configuration options in the BIOS chapter. System Overview ...
EP-308A/EP-308AS POS Page 93 Remote Access [Disabled]...
EP-308A/EP-308AS POSPage 94 Current Jumper Setting...
EP-308A/EP-308AS POS Page 95Appendix C C Terminology
EP-308A/EP-308AS POSPage 96 AC ’97 Audio Codec 97 (AC’97) refers to a codec standard developed by Intel® in 1997. ACPI Advanced Configuration and Po
EP-308A/EP-308AS POS Page 97EIDE Enhanced IDE (EIDE) is a newer IDE interface standard that has data transfer rates between 4.0 MBps and 16.6 MBps.
EP-308A/EP-308AS POSPage 98 SATA Serial ATA (SATA) is a serial communications bus designed for data transfers between storage devices and the comput
EP-308A/EP-308AS POS Page 99Appendix D D Watchdog Timer
EP-308A/EP-308AS POS Page 1Chapter 1 1 Introduction
EP-308A/EP-308AS POSPage 100 NOTE: The following discussion applies to DOS environment. IEI support is contacted or the IEI website visited for sp
EP-308A/EP-308AS POS Page 101 NOTE: When exiting a program it is necessary to disable the Watchdog Timer, otherwise the system resets. Example prog
EP-308A/EP-308AS POSPage 102 Appendix E E Hazardous Materials Disclosure
EP-308A/EP-308AS POS Page 103E.1 Hazardous Materials Disclosure Table for IPB Products Certified as RoHS Compliant Under 2002/95/EC Without Mercury
EP-308A/EP-308AS POSPage 104 Toxic or Hazardous Substances and Elements Part Name Lead (Pb) Mercury (Hg) Cadmium (Cd) Hexavalent Chromium (CR(VI)) P
EP-308A/EP-308AS POS Page 105此附件旨在确保本产品符合中国 RoHS 标准。以下表格标示此产品中某有毒物质的含量符合中国 RoHS 标准规定的限量要求。 本产品上会附有”环境友好使用期限”的标签,此期限是估算这些物质”不会有泄漏或突变”的年限。本产品可能包含有较短的环
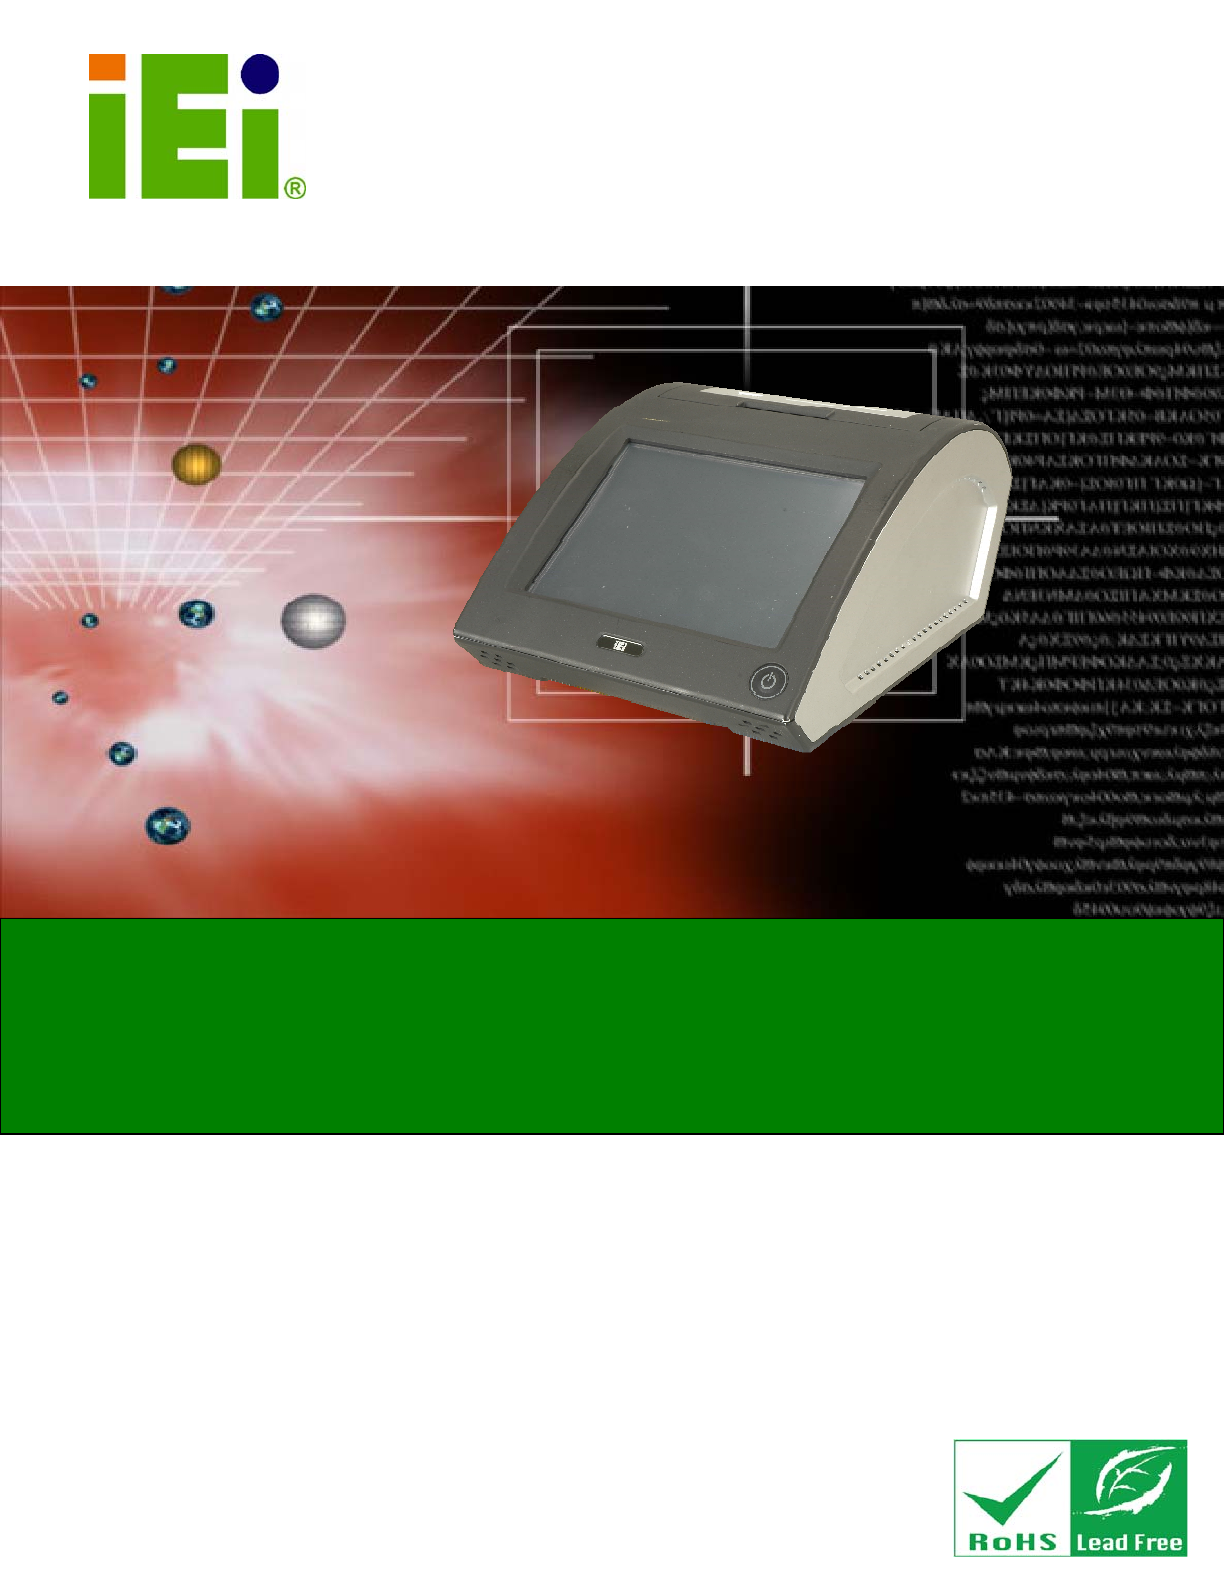
EP-308A/EP-308AS POSPage 2 1.1 Overview Figure 1-1: EP-308A/EP-308AS The EP-308A/EP-308AS is a Mini POS with a built-in thermal printer. The EP-308
EP-308A/EP-308AS POS Page 31.3 Front Panel The front side of the EP-308A/EP-308AS is a flat panel LCD screen surrounded by a frame. Figure 1-2: Fro
EP-308A/EP-308AS POSPage 4 Figure 1-3: Connectors 1.5 Technical Specifications The technical specifications for the EP-308A/EP-308AS systems are li
EP-308A/EP-308AS POS Page 5SPECIFICATION EP-308A-N270 EP-308AS-N270 I/O 1 x Gigabit LAN 1 x Power input (12 V) 1 x RJ-12 for cash drawer 1 x RS-2
EP-308A/EP-308AS POSPage 6 1.6 Dimensions Figure 1-4: Dimensions (units in mm)
EP-308A/EP-308AS POS Page 7Chapter 2 2 Installation
EP-308A/EP-308AS POSPage 8 WARNING: When installing the EP-308A/EP-308AS, make sure to: Set screen resolution to 800 x 600: To make sure that th
EP-308A/EP-308AS POS Page 9 WARNING! Only remove the protective plastic cover stuck to the front screen after installation. The plastic layer protec
EP-308A/EP-308AS POSPage ii Revision Date Version Changes 18 November, 2010 1.14 Added paper jam troubleshooting (Section 2.8.1) 1 October, 2010
EP-308A/EP-308AS POSPage 10 Quantity Item Image 2 RJ-45 to DB-9 cable 1 Utility CD Table 2-1: Packing List 2.3 Drive Installation The EP-308A/E
EP-308A/EP-308AS POS Page 11Step 1: Slice the hard drive on to connect with the SATA connector. Step 2: Fasten the screws.Step 0: Figure 2-2: Al
EP-308A/EP-308AS POSPage 12 2.4 Mounting the System WARNING! Dropping the EP-308A/EP-308AS can cause irreparable damage. Handle the EP-308A/EP-308A
EP-308A/EP-308AS POS Page 132.5.1 LAN Connection Cable The RJ-45 connectors enable connection to an external network. To connect a LAN cable with
EP-308A/EP-308AS POSPage 14 Step 2: Insert the RJ-45 to DB-9 cable. Step 3: Insert the serial connector. Insert the DB-9 connector of a serial dev
EP-308A/EP-308AS POS Page 15 Figure 2-7: USB Device Connection Step 3: Insert the device connector. Once aligned, gently insert the USB device conn
EP-308A/EP-308AS POSPage 16 Figure 2-8: VGA Connector Step 4: Secure the connector. Secure the DB-15 VGA connector from the VGA monitor to the ext
EP-308A/EP-308AS POS Page 17The following drivers can be installed on the system, each driver is in its own directory on the driver CD. Install the
EP-308A/EP-308AS POSPage 18 2.8 Printer Paper Installation To install the roll of paper for the cash register, please follow the steps below. Step 1
EP-308A/EP-308AS POS Page 19Step 3: The paper should pass through the U-slot as shown below. Figure 2–12: U-slot Alignment Step 4: Push the cover
EP-308A/EP-308AS POS Page iiiCopyright COPYRIGHT NOTICE The information in this document is subject to change without prior notice in order to impro
EP-308A/EP-308AS POSPage 20 Figure 2-14: Push the Cover Step 2: Press the EJECT button to open the cover. Figure 2-15: Open the Cover Step 3:
EP-308A/EP-308AS POS Page 212.9 Thermal Printer Setup The EP-308A has a 2.0” thermal printer connected to COM port through USB bridge while the ther
EP-308A/EP-308AS POSPage 22 Step 2: Click NEXT to start the driver installation. Figure 2-18: Installation Wizard Step 3: Click FINISH to complet
EP-308A/EP-308AS POS Page 232.9.1.2 Checking Installation To check the installation, look for the USB device shown in the diagram below. Figure 2–20
EP-308A/EP-308AS POSPage 24 2.9.1.3 Install the Printer Driver Step 1: Extract the driver from "F732". Step 2: Run "Install.exe&q
EP-308A/EP-308AS POS Page 25Step 4: Select "Local printer attached to this computer" then click NEXT. Figure 2-23: Select Local Printer
EP-308A/EP-308AS POSPage 26 Step 6: Select "PrnTek-54C" then click NEXT to continue. Figure 2-25: Install Printer Software Step 7: Ente
EP-308A/EP-308AS POS Page 27Step 8: Choose whether or not to print a test page, then click NEXT to continue. Figure 2-27: Print Test Page Step 9:
EP-308A/EP-308AS POSPage 28 2.9.1.4 Setting the Communication Protocol Step 1: Right-click the printer icon in "Printers and Faxes", then
EP-308A/EP-308AS POS Page 29Step 3: Set the options in Figure 2-31 as shown below. Bits per second: 460800 Data bits: 8 Parity: None Sto
EP-308A/EP-308AS POSPage iv Table of Contents 1 INTRODUCTION...
EP-308A/EP-308AS POSPage 30 2.9.2 EP-308AS Thermal Printer Setup The internal printer of the EP-308AS is connected to the serial port COMx. To setup
EP-308A/EP-308AS POS Page 31Step 3: Click NEXT to start the printer driver installation wizard. Figure 2-33: Printer Driver Installation Wizard St
EP-308A/EP-308AS POSPage 32 Step 5: Select "COM5 (Serial Port)", then click NEXT to continue Figure 2-35: Select Serial Port Step 6: Se
EP-308A/EP-308AS POS Page 33Step 7: Enter a name for the printer, then click NEXT to continue. Figure 2-37: Choose Printer Name
EP-308A/EP-308AS POSPage 34 Step 8: Select “Replace existing driver”, then click NEXT to continue. Figure 2-38: Use Existing Driver Page
EP-308A/EP-308AS POS Page 35Step 9: Choose whether or not to print a test page, then click NEXT to continue. Figure 2-39: Print Test Page Step 10:
EP-308A/EP-308AS POSPage 36 2.9.2.2 Setting the Communication Protocol Step 1: Access the Printer and Faxes window by clicking “Printer and Faxes”
EP-308A/EP-308AS POS Page 37Step 2: Right-click the printer icon in "Printers and Faxes", then select "Properties". Figure 2-4
EP-308A/EP-308AS POSPage 38 Step 3: Click Ports tab. Select "COM5: Serial Port", then click "Configure Port…" Figure 2-43: Con
EP-308A/EP-308AS POS Page 39Step 4: Set the options in Figure 2-31 as shown below. Bits per second: 115200 Data bits: 8 Parity: None Sto
EP-308A/EP-308AS POS Page v2.9.2.1 Install the Printer Driver ... 30 2.9.2.2
EP-308A/EP-308AS POSPage 40 Chapter 3 3 BIOS Setup
EP-308A/EP-308AS POS Page 413.1 Introduction The BIOS is programmed onto the BIOS chip. The BIOS setup program allows changes to certain system sett
EP-308A/EP-308AS POSPage 42 Key Function F2 /F3 key Change color from total three colors. F2 to select color forward. F10 key Save all the CMOS c
EP-308A/EP-308AS POS Page 433.2 Main The Main BIOS menu (BIOS Menu 1) appears when the BIOS Setup program is entered. The Main menu gives an overvie
EP-308A/EP-308AS POSPage 44 The System Overview field also has two user configurable fields: System Time [xx:xx:xx] Use the System Time option to
EP-308A/EP-308AS POS Page 453.3.1 CPU Configuration Use the CPU Configuration menu (BIOS Menu 3) to view detailed CPU specifications and configure t
EP-308A/EP-308AS POSPage 46 3.3.2 IDE Configuration Use the IDE Configuration menu (BIOS Menu 4) to change and/or set the configuration of the IDE d
EP-308A/EP-308AS POS Page 47Î PATA Only Only the IDE drives are enabled. SATA drives are disabled Configure SATA as [IDE] Use the Configure SAT
EP-308A/EP-308AS POSPage 48 Type: Indicates the type of devices a user can manually select Vendor: Lists the device manufacturer Size: List
EP-308A/EP-308AS POS Page 49Î ARMD This option specifies an ATAPI Removable Media Device. These include, but are not limited to: ZIP LS-120 LBA/
EP-308A/EP-308AS POSPage vi 4 SYSTEM MAINTENANCE ... 83 4.1 SYST
EP-308A/EP-308AS POSPage 50 Î Auto DEFAULT BIOS auto detects the PIO mode. Use this value if the IDE disk drive support cannot be determined. Î 0 P
EP-308A/EP-308AS POS Page 51Î UDMA1 Ultra DMA mode 1 selected with a maximum data transfer rate of 25 MB/s Î UDMA2 Ultra DMA mode 2 selected wit
EP-308A/EP-308AS POSPage 52 3.3.3 Super IO Configuration Use the Super IO Configuration menu (BIOS Menu 6) to set or change the configurations for t
EP-308A/EP-308AS POS Page 53 Serial Port3 Address [3E8] Selects the serial port base address. Î Disabled No base address Î 3E8 DEFAULT I/O addr
EP-308A/EP-308AS POSPage 54 3.3.4 Hardware Health Configuration The Hardware Health Configuration menu (BIOS Menu 7) shows the operating temperatur
EP-308A/EP-308AS POS Page 55Î PWM Manual mode The fan spins at the speed set in: Fan PWM control Temp. Limit of OFF [000] WARNING: CPU failur
EP-308A/EP-308AS POSPage 56 0 PWM 1 PWM 2 PWM 4 PWM 8 PWM 16 PWM 32 PWM 64 PWM CPU Fan PWM Control [070] This value specifies the
EP-308A/EP-308AS POS Page 573.3.5 Power Configuration The Power Configuration menu (BIOS Menu 8) allows the advanced power management options to be
EP-308A/EP-308AS POSPage 58 Suspend Mode [S1(POS)] Use the Suspend Mode option to specify the sleep state the system enters when it is not being
EP-308A/EP-308AS POS Page 59Î On/Off DEFAULT When the power button is pressed the system is either turned on or off Î Suspend When the power button
EP-308A/EP-308AS POS Page viiList of Figures Figure 1-1: EP-308A/EP-308AS...
EP-308A/EP-308AS POSPage 60 Resume On RTC Alarm [Disabled] Use the Resume On RTC Alarm option to specify the time the system should be roused fro
EP-308A/EP-308AS POS Page 61 Remote Access [Disabled] Use the Remote Access option to enable or disable access to the remote functionalities of th
EP-308A/EP-308AS POSPage 62 115200 8,n,1 DEFAULT 57600 8,n,1 38400 8,n,1 19200 8,n,1 09600 8,n,1 NOTE: Identical baud rate setting musts
EP-308A/EP-308AS POS Page 63Î ANSI DEFAULT The target terminal type is ANSI Î VT100 The target terminal type is VT100 Î VT-UTF8 The target termina
EP-308A/EP-308AS POSPage 64 3.3.7 USB Configuration Use the USB Configuration menu (BIOS Menu 12) to read USB configuration information and configur
EP-308A/EP-308AS POS Page 65 USB 2.0 Controller [Enabled] Use the USB 2.0 Controller BIOS option to enable or disable the USB 2.0 controller Î D
EP-308A/EP-308AS POSPage 66 3.3.7.1 USB Mass Storage Device Configuration Use the USB Mass Storage Device Configuration menu (BIOS Menu 13) to conf
EP-308A/EP-308AS POS Page 67 Emulation Type [Auto] Use the Emulation Type BIOS option to specify the type of emulation BIOS has to provide for the
EP-308A/EP-308AS POSPage 68 BIOS SETUP UTILITY Main Advanced PCIPNP Boot Security Chipset Exit Advanced PCI/PnP Settings ⎯⎯⎯⎯⎯⎯⎯⎯⎯⎯⎯⎯⎯⎯⎯⎯⎯⎯⎯⎯
EP-308A/EP-308AS POS Page 69 IRQ10 IRQ 11 IRQ 14 IRQ 15 DMA Channel# [Available] Use the DMA Channel# option to assign a specific DMA chan
EP-308A/EP-308AS POSPage viii Figure 2-27: Print Test Page...
EP-308A/EP-308AS POSPage 70 3.5 Boot Use the Boot menu (BIOS Menu 15) to configure system boot options. BIOS SETUP UTILITY Main Advanced PCIPNP B
EP-308A/EP-308AS POS Page 71 Quick Boot [Enabled] Use the Quick Boot BIOS option to make the computer speed up the boot process. Î Disabled No PO
EP-308A/EP-308AS POSPage 72 Î On DEFAULT Allows the Number Lock on the keyboard to be enabled automatically when the computer system boots up. This
EP-308A/EP-308AS POS Page 733.5.2 Boot Device Priority Use the Boot Device Priority menu (BIOS Menu 17) to specify the boot sequence from the availa
EP-308A/EP-308AS POSPage 74 3.5.3 Hard Disk Drives Use the Hard Disk Drives menu to specify the boot sequence of the available HDDs. Only installed
EP-308A/EP-308AS POS Page 753.5.5 CD/DVD Drives Use the CD/DVD Drives menu to specify the boot sequence of the available CD/DVD drives. When the men
EP-308A/EP-308AS POSPage 76 3.6 Security Use the Security menu (BIOS Menu 21) to set system and user passwords. BIOS SETUP UTILITY Main Advanced P
EP-308A/EP-308AS POS Page 773.7 Chipset Use the Chipset menu (BIOS Menu 22) to access the Northbridge and Southbridge configuration menus WARNING!
EP-308A/EP-308AS POSPage 78 3.7.1 Northbridge Configuration Use the Northbridge Chipset Configuration menu (BIOS Menu 23) to configure the Northbrid
EP-308A/EP-308AS POS Page 79Î Enable, 1 MB Dedicates 1 MB of main memory for graphics Î Enable, 8 MB DEFAULT Dedicated 8 MB of main memory for gr
EP-308A/EP-308AS POS Page ixList of Tables Table 1-1: Technical Specifications...
EP-308A/EP-308AS POSPage 80 LVDS Panel Type Use the Panel Type to determine the LCD panel resolution. Configuration options are listed below:
EP-308A/EP-308AS POS Page 81 Cashdraw Control [Enabled] Use the Cashdraw Control option to enable or disable the port that controls the cashdraw.
EP-308A/EP-308AS POSPage 82 Save Changes and Exit Use the Save Changes and Exit option to save the changes made to the BIOS options and to exit
EP-308A/EP-308AS POS Page 83Chapter 4 4 System Maintenance
EP-308A/EP-308AS POSPage 84 4.1 System Maintenance Introduction If the components of the EP-308A/EP-308AS fail they must be replaced, such as the wi
EP-308A/EP-308AS POS Page 85 Figure 4-1: Bottom Cover Retention Screws 4.4 Memory Module Replacement The flat panel PC has a preinstalled memory m
EP-308A/EP-308AS POSPage 86 Figure 4-2: DDR SO-DIMM Module Installation 4.5 Hard Drive and CompactFlash® Replacement To replace the hard drive or C
EP-308A/EP-308AS POS Page 87Appendix A A Safety Precautions
EP-308A/EP-308AS POSPage 88 WARNING: The precautions outlined in this chapter should be strictly followed. Failure to follow these precautions may
EP-308A/EP-308AS POS Page 89A.1.2 Anti-static Precautions WARNING: Failure to take ESD precautions during the installation of the EP-308A/EP-308AS
Manuais e produtos relacionados com Micro-ondas Sharp R-308A
 (180 páginas)
(353 páginas)
(229 páginas)
(174 páginas)
(72 páginas)
(3 páginas)
(33 páginas)
(11 páginas)
(128 páginas)
(40 páginas)
(24 páginas)
(166 páginas)
(8 páginas)
(74 páginas)
(180 páginas)
(353 páginas)
(229 páginas)
(174 páginas)
(72 páginas)
(3 páginas)
(33 páginas)
(11 páginas)
(128 páginas)
(40 páginas)
(24 páginas)
(166 páginas)
(8 páginas)
(74 páginas)
 (160 páginas)
(40 páginas)
(43 páginas)
(27 páginas)
(18 páginas)
(12 páginas)
(160 páginas)
(40 páginas)
(43 páginas)
(27 páginas)
(18 páginas)
(12 páginas)
© 2020, manymanuals-pt.com. Todos os direitos reservados. | 0.064 s |
 Manymanuals.com
 Manymanuals.de
 Manymanuals.fr
 Manymanuals.it
 Manymanuals.pl
 Manymanuals.cz
 Manymanuals.es
 Manymanuals-pt.com
Comentários a estes Manuais